RaspberryPi で構築する Bare-Metal Kubernetes - 準備編
- Authors
- Name
- ごとれん
- X
- @ren510dev
目次
- 目次
- はじめに
- 全体の流れ
- 1. 機器類の準備
- RaspberryPi 4 Model B
- PoE+ HAT
- RaspberryPi クラスタの構築
- 2. 技術選定
- Control-Plane / Data-Plane
- CRI:Container Runtime Interface
- CNI:Container Network Interface
- LB:Load Balancer
- 3. ネットワーク設計
- 全体構成
- クラスタネットワーク
- 4. RaspberryPi の初期設定
- SD カードのフォーマット
- OS インストール
- リモート接続
- スペック確認
- ホスト名変更
- IP アドレス設定
- SSH キーの登録
- リモートデスクトップ設定
- まとめ
- 参考・引用

はじめに
クラウドネイティブ に注目が集まる昨今、コンテナオーケストレーションツールとして Kubernetes がデファクトスタンダードな基盤技術となっています。 Kubernetes を用いることで 宣言的な設定(Declarative Configuration)に基づいたアプリケーションのデプロイ、管理、運用の自動化、スケーラビリティの確保等を実現することができます。
Kubernetes によりサービス運用の効率化や高度な自動化を実現できますが、内部のアーキテクチャは非常に複雑なものになっており、コンピュータサイエンスの基本的な知識も必要になります。 運用に際して、インフラエンジニアやクラスタの管理者は Kubernetes の内部コンポーネントの詳細や、その挙動を熟知しておくことが重要です。
Kubernetes の有名な学習リソースの一つに Kubernetes The Hard Way というものがあります。 これは、手作業で一からクラスタを構築して Kubernetes の内部構造への理解を深めるというコンテンツです。
Kubernetes The Hard Way では、主に GCP の Compute Engine を用いますが、今回は RaspberryPi をベースにベアメタルでクラスタを構築してみました。 いわゆる『おうち Kubernetes』というやつです。
今回は、RaspberryPi で Kubernetes をセルフホスティングする方法について 『準備編』『構築編』『エコシステム編』 の 3 編にわたり紹介したいと思います。
準備編では、機器類の準備、RaspberryPi の初期設定をします。 また、Kubernetes の構築に必要となる各種 OSS の選定や、ネットワーク構成およびインフラ全体の設計について固めます。
全体の流れ
以下の流れで作業します。
【準備編】準備・設計 ⭐️ 本ブログ ⭐️
- 機器類の準備: RaspberryPi 等の必要機器を準備します。
- 技術選定:主に CRI / CNI / LB を選定します。
- ネットワーク設計:ネットワーク構成と IP アドレスレンジを決定します。
- RaspberryPi の初期設定:OS のインストールとホストマシンの基礎設定をします。
【構築編】クラスタ構築
- Kubernetes のインストール:依存パッケージの追加とカーネルパラメータを設定します。
- Kubernetes の初期設定:Control-Plane / Data-Plane を構築します。
- アプリケーションのデプロイ:アプリケーションを追加して MetaLB で公開します。
- 【番外編】MetalLB の仕組み:MetalLB の仕組みについて紹介します。
【エコシステム編】エコシステム整備
- モニタリング基盤の整備:クラスタメトリクスを収集して監視基盤を構築します。
- GitOps の整備:GitHub とベアメタル Kubernetes を接続します。
1. 機器類の準備
モニターやキーボード、マウス等、最低限の周辺機器は所持しているものとして以下を準備します。
| 機材名 | 個数 | 値段(単価) |
|---|---|---|
| RaspberryPi 4 Model B 8GB | 4 個 | ¥56,080 ( ¥14,020 ) |
| RaspberryPi PoE+ HAT | 4 個 | ¥15,920 ( ¥3,980 ) |
| micro SD card 32 GB | 4 個 | ¥6,600 ( ¥1,650 ) |
| RaspberryPi 4 クラスタケース 冷却ファン付き | 1 個 | ¥2,499 |
| PoE スイッチ - TL-SG1005P | 1 個 | ¥7,047 |
| LAN ケーブル 0.15m | 4 本 | ¥3,520 ( ¥880 ) |
| LAN ケーブル 1m | 1 本 | ¥892 |
| microHDMI-HDMI 変換ケーブル | 1 本 | ¥562 |
| アクリル板 100mm*100mm*2mm | 1 枚 | ¥304 |
| ネジ | 12 本 | ¥927 |
| 両面テープ | 6 枚 | ¥588 |
価格は購入当時(2022 年 4 月現在)の値段ですが、時期によって変動する場合があります。 全部で ¥94,939(≒ ¥95,000) ぐらいです。
RaspberryPi 4 Model B

RaspberryPi はイギリスの RaspberryPi Foundation が開発している名刺サイズのシングルボードコンピュータです。 主に教育用途を想定して設計されましたが、低価格ながら高性能なスペックであることから、現在では小規模なサーバや IoT の開発、試作や研究分野でも広く利用されています。
今回は RaspberryPi 4 Model B 8GB を用います。
| スペック | 情報 |
|---|---|
| Machine | RaspberryPi 4 Model B |
| OS | Debian GNU/Linux 12 (bookworm) 64bit |
| CPU | Cortex-A72 (ARMv8) BCM2711 @1.5GHz 4cores 4threads |
| Architecture | ARM (aarch64) |
| Memory | 8GB LPDDR4-3200 SDRAM |
| Storage | 32GB microSD |
Control-Plane 1 台 / Data-Plane 3 台 の計 4 台の RaspberryPi を使用します。 クラスタのスペックは 物理 CPU 12core(4core x3)メモリ 24GB(8GB x3)ストレージ容量 96GB(32GB x3)となります。
PoE+ HAT

PoE+ HAT を用いることで、電源供給をネットワークスイッチから Ether ケーブル一本で行うことが可能になります。 もちろん Type-C から給電することもできます。
また、RaspberryPi 4 Model B はプロセッサの処理能力が向上したことで消費電流も以前の機種と比べて大きくなっています。 財団公式より、RaspberryPi 4 Model B には 定格 5.1V / 3.0A DC 出力 15W 以上 が必要とされています。
また、排熱の観点からヒートシンクやファンを取り付けておいた方が良いですが、公式の RaspberryPi PoE+ HAT には 25mm ファンが搭載されており、GPIO ピンを通じて SoC 温度に応じた回転制御機能もあります。
RaspberryPi クラスタの構築
組み立て方法に関しては サイバーエージェント 青山さんの Develoer Blog を参考にします。

配線をいい感じにしてアクリル板に固定します。

2. 技術選定
まず、クラスタを構築するためのツールを選定します。
また、Kubernetes を動かすためには CRI(Container Runtime Interface)、CNI(Container Network Interface)、LB(Load Balancer)等のソフトウェアが必要になります。 今回は以下の OSS を採用します。
| OSS | コンポーネント | 説明 |
|---|---|---|
| kubeadm | Control-Plane / Data-Plane | Kubernetes クラスタそのものの構築 |
| containerd | CRI | Pod を動かすためのコンテナランタイムとして機能 |
| flannel | CNI | Pod 間通信を確立 |
| MetalLB | LB(L4) | クラスタに外部 IP アドレス(LAN IP)を付与 |
Control-Plane / Data-Plane
クラスタの構築・管理ツールには Kubernetes(CNCF)公式から提供されている kubeadm を用いることにします。 ただし、kubeadm は Rancher のような GUI は用意されていません。

kubeadm:
Kubeadm is a tool built to provide best-practice "fast paths" for creating Kubernetes clusters. It performs the actions necessary to get a minimum viable, secure cluster up and running in a user-friendly way. Kubeadm's scope is limited to the local node filesystem and the Kubernetes API, and it is intended to be a composable building block of higher level tools.
CRI:Container Runtime Interface
以前は dockershim で運用していましたが、Kubernetes v1.21 以降 Deprecate、v1.24 で Removal となったため、ネイティブな CRI をサポートする containerd を選定しました。 containerd を利用することで、Docker との互換性を維持しつつ移行作業が進められます。参考

containerd:
containerd is an industry-standard container runtime with an emphasis on simplicity, robustness, and portability. It is available as a daemon for Linux and Windows, which can manage the complete container lifecycle of its host system: image transfer and storage, container execution and supervision, low-level storage and network attachments, etc.
CNI:Container Network Interface
flannel は Kubernetes におけるコンテナネットワークを提供するための CNI プラグインで、他の OSS と比較して軽量かつシンプルな設計となっているのが特徴です。 Pod 間通信を実現するために、クラスタ内の各ノード上で VXLAN ベースのオーバーレイネットワークおよびルーティングを管理します。

flannel:
Flannel runs a small, single binary agent called flanneld on each host, and is responsible for allocating a subnet lease to each host out of a larger, preconfigured address space. Flannel uses either the Kubernetes API or etcd directly to store the network configuration, the allocated subnets, and any auxiliary data (such as the host's public IP). Packets are forwarded using one of several backend mechanisms including VXLAN and various cloud integrations.
LB:Load Balancer
MetalLB は Kubernetes で type: LoadBalancer のサービスを動かすための Addon コンポーネントです。 特に、オンプレミス環境(ベアメタル) やセルフホスティングされたクラスタにおいて L4 の負荷分散機構を提供します。
日本では サイボウズ - Neco プロジェクト での導入事例が有名です。

MetalLB:
Bare-metal cluster operators are left with two lesser tools to bring user traffic into their clusters, “NodePort” and “externalIPs” services. Both of these options have significant downsides for production use, which makes bare-metal clusters second-class citizens in the Kubernetes ecosystem. MetalLB aims to redress this imbalance by offering a network load balancer implementation that integrates with standard network equipment, so that external services on bare-metal clusters also “just work” as much as possible.
3. ネットワーク設計
まず、アーキテクチャとクラスタのネットワークを設計します。
全体構成
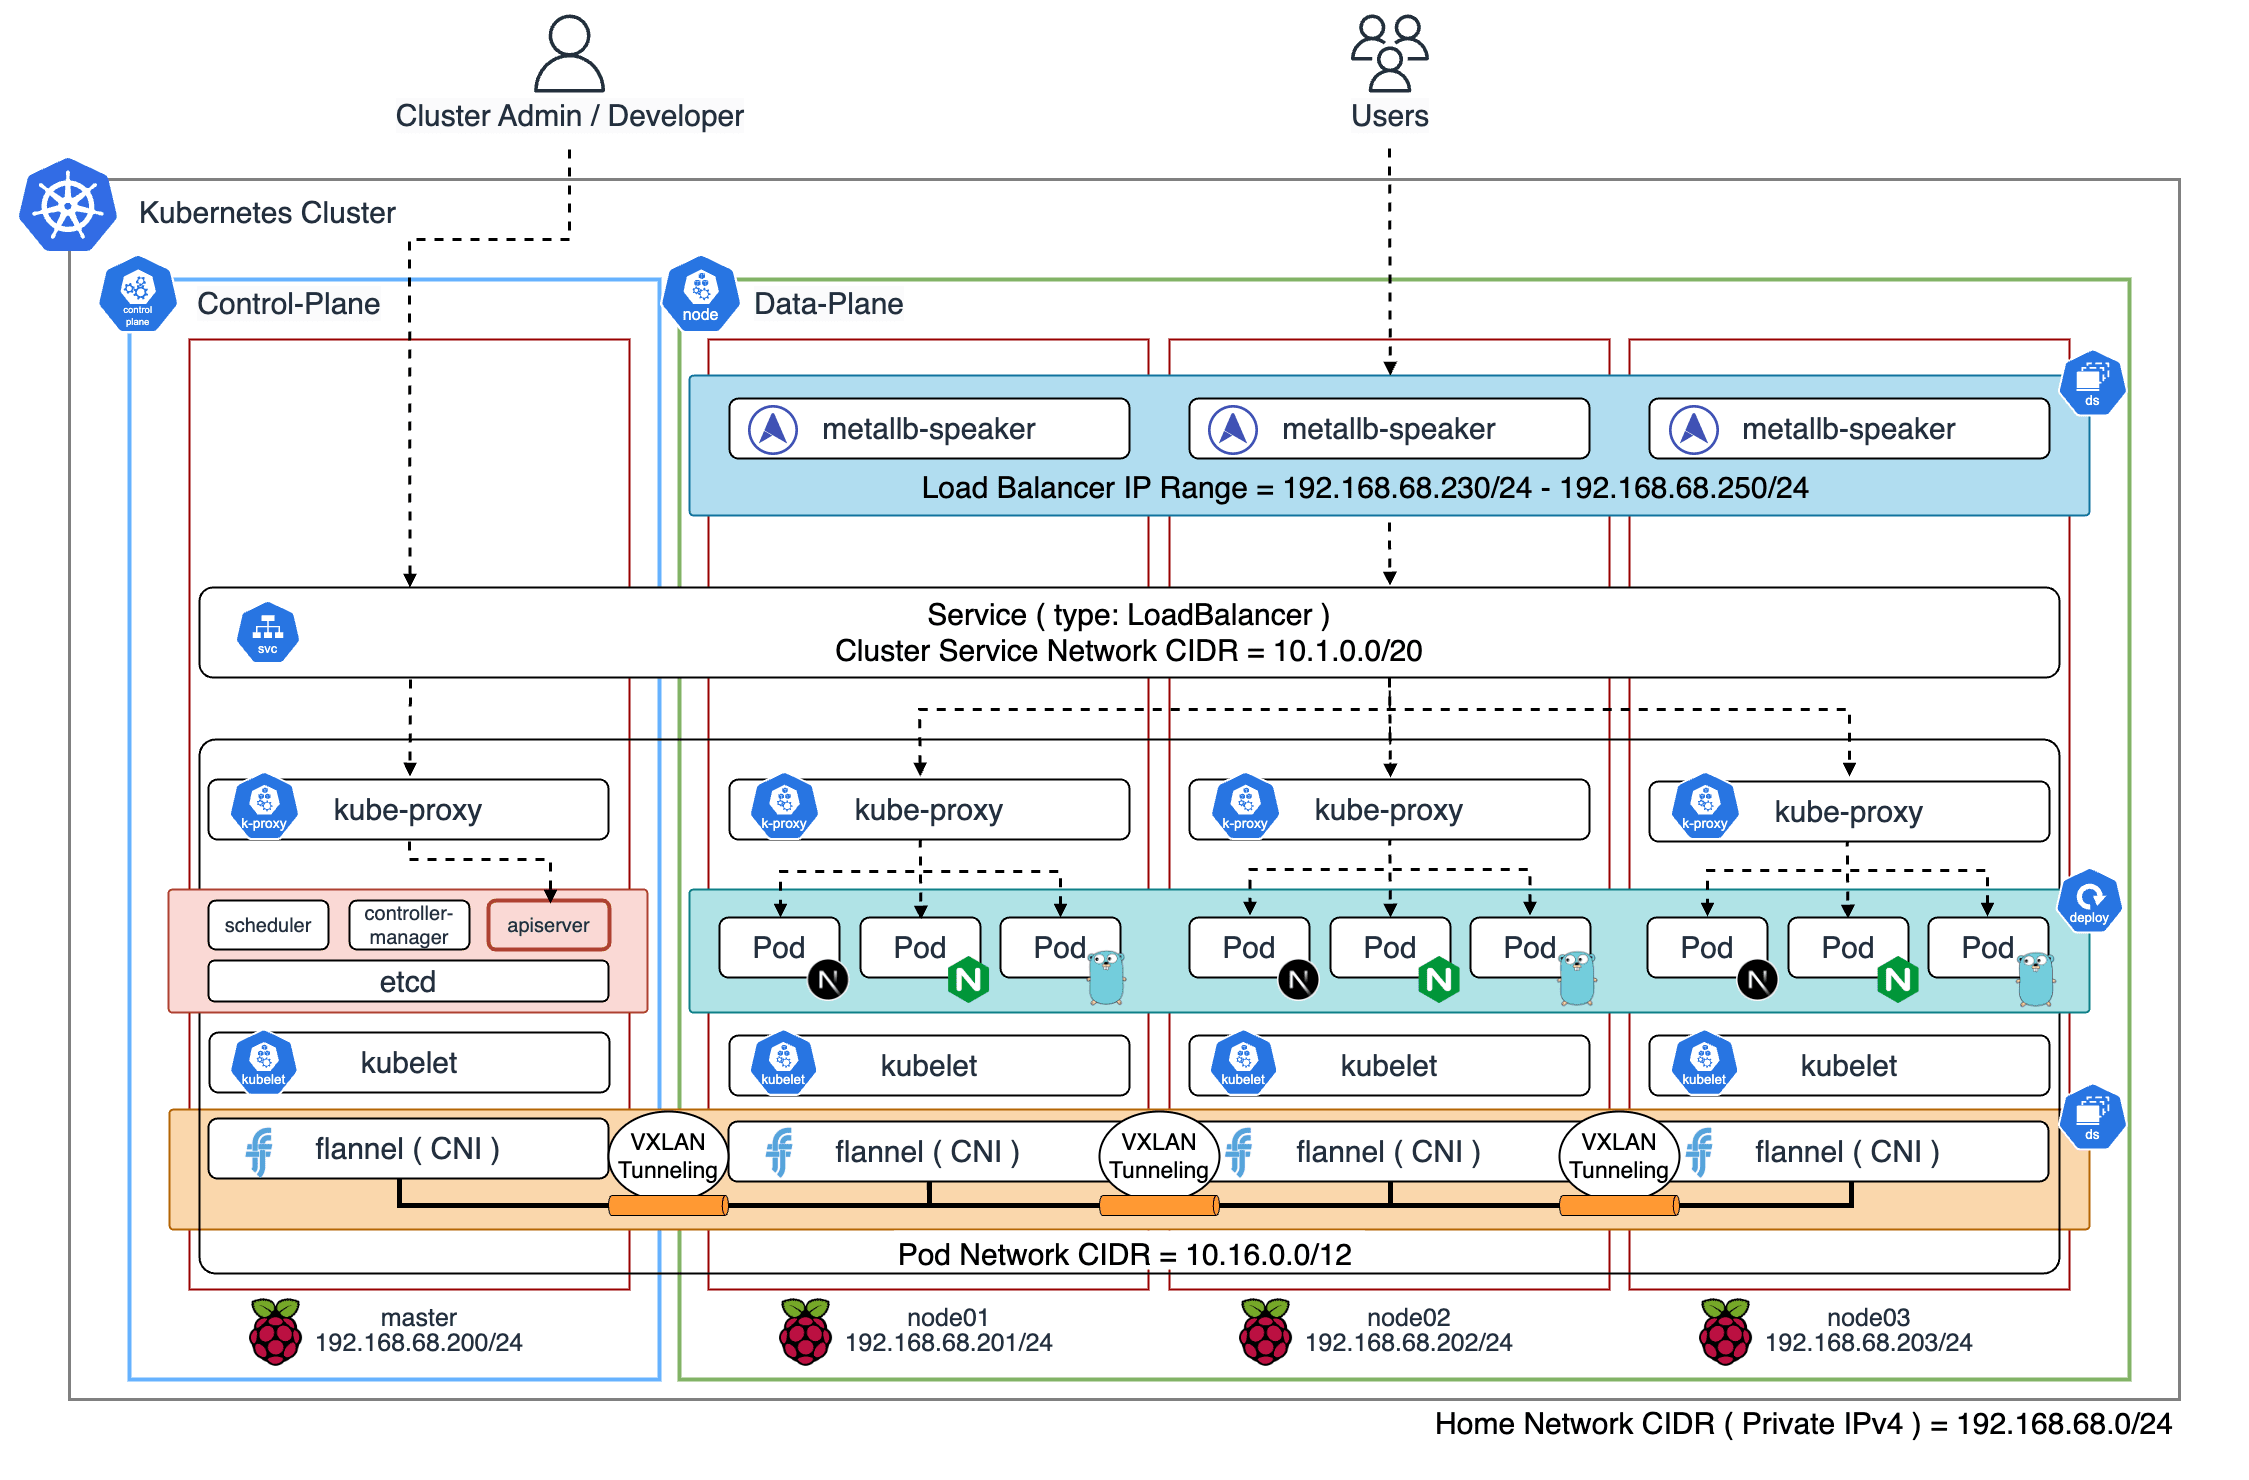
RaspberryPi を以下の通り構成・配置して、IP アドレスを割り振ります。

RaspberryPi の eth0 I/F は PoE L2 スイッチングハブに接続して、そこからブロードバンドルータに接続します。 ブロードバンドルータには TP-Link Deco M9 Plus を使用しています。
RaspberryPi には PoE+ Hat を取り付けているため、ネットワークスイッチ(IEEE 802.3at PSE)から Ether ケーブル一本で給電するとともに、ノード間で通信するための IP アドレスを割り当てます。
また、SSH 接続やトラブルの際のバックアップリンクとして IEEE 802.11 系で wlan0 I/F にもアドレスを付与しておきます。
今回はプライベートネットワーク(LAN)内からのアクセスに限定し、アドレスファミリは IPv4 のみを用います。 各種ソフトウェアのインストール時は、ブロードバンドルータで NAPT してインターネットへ出します。
- ネットワーククラス:クラス C(192.168.68.0/24)
- ネットワークアドレス:192.168.68.0
- ブロードキャストアドレス:192.168.68.255
- サブネットマスク:255.255.255.0
- CIDR:/24
- 収容台数:1-254(254 台)
- デフォルトゲートウェイ:192.168.68.1/24
- DNS サーバ:192.168.68.1/24
| ホスト名 | ロール | ノード IP(eth0) | 管理用 IP(wlan0) |
|---|---|---|---|
| master | Control-Plane | 192.168.68.200/24 | 192.168.68.210/24 |
| node01 | Data-Plane | 192.168.68.201/24 | 192.168.68.211/24 |
| node02 | Data-Plane | 192.168.68.202/24 | 192.168.68.212/24 |
| node03 | Data-Plane | 192.168.68.203/24 | 192.168.68.213/24 |
クラスタネットワーク
次にクラスタ内で使用する IP アドレス範囲を決めます。
- Pod の IP アドレスレンジ
- 10.16.0.0/12(1,048,574 個)
- ローカルネットワーク内で使用していない IP アドレスを選択する
- クラスタサービス の IP アドレスレンジ
- 10.1.0.0/20(4,094 個)
- ローカルネットワーク内で使用していない IP アドレスを選択する
- MetalLB が利用する静的 IP アドレスの予約
- 192.168.68.230 - 192.168.68.250(20 個)
- DHCP でプライベート IP を払い出すので 192.168.68.0/24 サブネットレンジから選択する
- Deco の場合は IP アドレスはデフォルトで 192.168.68.100 - 192.168.68.250 から払い出される
設定用 PC(Cluster Admin / Developer の部分)には macOS を用います。
4. RaspberryPi の初期設定
設計が固まったら、早速以下の工程に基づいて RaspberryPi の初期設定を行います。
SD カードのフォーマット
microSD カードを、設定用の PC(macOS)に接続してフォーマットします。 今回は SD Card Formatter というメモリフォーマッタを使用します。

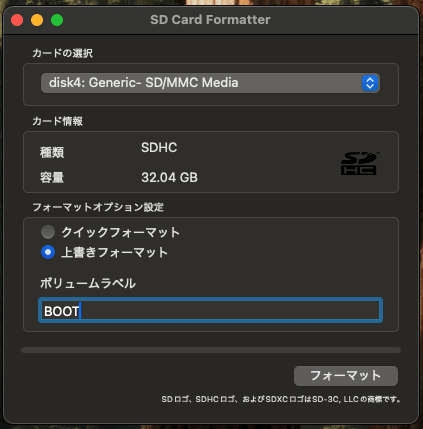
32GB の SD Media が接続されていることを確認して『上書きフォーマット』を実行します。 ボリュームラベルは BOOT としておきます。
OS インストール
次に、RaspberryPi を起動するための OS をインストールします。 RaspberryPi には RaspberryPi OS(Raspbian)と呼ばれる Debian 派生の Linux を使用します。

こちらのサイト から『RaspberryPi OS with desktop 64bit』を選択してディスクイメージ(.img)をダウンロードします。

ダウンロードした OS イメージを SD カードに焼きます。 今回は手取り早く GUI で操作できる balenaEtcher を使用します。


SD カードを RaspberryPi に挿入してから PoE ケーブルを接続して起動します。
以下のようなデスクトップが表示されれば OS のインストール作業は完了です。

リモート接続
RaspberryPi にリモート接続できるようにします。
左上の RaspberryPi アイコン > Preferences > RaspberryPi Configuration > Interfaces
SSH(Secure Shell)と VNC(Virtual Network Computing)を有効化します。

$ ssh [email protected]
[email protected]'s password:
Linux raspberrypi 6.6.62+rpt-rpi-v8 #1 SMP PREEMPT Debian 1:6.6.62-1+rpt1 (2024-11-25) aarch64

The programs included with the Debian GNU/Linux system are free software;
the exact distribution terms for each program are described in the
individual files in /usr/share/doc/*/copyright.

Debian GNU/Linux comes with ABSOLUTELY NO WARRANTY, to the extent
permitted by applicable law.
Last login: Wed Jan 29 01:40:38 2025 from 192.168.68.106
リモート接続できることを確認します。
スペック確認
作業の前に、意図したスペックであるかを確認しておきます。
### OS
$ cat /etc/os-release
PRETTY_NAME="Debian GNU/Linux 12 (bookworm)"
NAME="Debian GNU/Linux"
VERSION_ID="12"
VERSION="12 (bookworm)"
VERSION_CODENAME=bookworm
ID=debian
HOME_URL="https://www.debian.org/"
SUPPORT_URL="https://www.debian.org/support"
BUG_REPORT_URL="https://bugs.debian.org/"
### CPU ###
# - 物理コア数: 4
# - 論理コア数(スレッド数): 4
# - 最大クロック速度: 1.8GHz

$ lscpu
Architecture:             aarch64
  CPU op-mode(s):         32-bit, 64-bit
  Byte Order:             Little Endian
CPU(s):                   4
  On-line CPU(s) list:    0-3
Vendor ID:                ARM
  Model name:             Cortex-A72
    Model:                3
    Thread(s) per core:   1
    Core(s) per cluster:  4
    Socket(s):            -
    Cluster(s):           1
    Stepping:             r0p3
    CPU(s) scaling MHz:   44%
    CPU max MHz:          1800.0000
    CPU min MHz:          600.0000
    BogoMIPS:             108.00
    Flags:                fp asimd evtstrm crc32 cpuid
Caches (sum of all):
  L1d:                    128 KiB (4 instances)
  L1i:                    192 KiB (4 instances)
  L2:                     1 MiB (1 instance)
NUMA:
  NUMA node(s):           1
  NUMA node0 CPU(s):      0-3
Vulnerabilities:
  Gather data sampling:   Not affected
  Itlb multihit:          Not affected
  L1tf:                   Not affected
  Mds:                    Not affected
  Meltdown:               Not affected
  Mmio stale data:        Not affected
  Reg file data sampling: Not affected
  Retbleed:               Not affected
  Spec rstack overflow:   Not affected
  Spec store bypass:      Vulnerable
  Spectre v1:             Mitigation; __user pointer sanitization
  Spectre v2:             Vulnerable
  Srbds:                  Not affected
  Tsx async abort:        Not affected
### メモリ
$ free -h
               total        used        free      shared  buff/cache   available
Mem:           7.6Gi       266Mi       7.2Gi       1.3Mi       276Mi       7.4Gi
Swap:          511Mi          0B       511Mi

### ストレージ
$ df -h
Filesystem      Size  Used Avail Use% Mounted on
udev            3.6G     0  3.6G   0% /dev
tmpfs           781M  1.3M  780M   1% /run
/dev/mmcblk0p2   29G  5.4G   22G  20% /               # microSD p2 パーティション
tmpfs           3.9G  8.0K  3.9G   1% /dev/shm
tmpfs           5.0M   16K  5.0M   1% /run/lock
/dev/mmcblk0p1  510M   75M  436M  15% /boot/firmware  # microSD p1 パーティション
tmpfs           781M   40K  781M   1% /run/user/1000
ホスト名変更
以下の二つのファイルをそれぞれ変更します。 各コンポーネントに応じた名前を付与します。
$ sudo vim /etc/hostname
master
$ sudo vim /etc/hosts
127.0.0.1	localhost
::1		localhost ip6-localhost ip6-loopback
ff02::1		ip6-allnodes
ff02::2		ip6-allrouters

127.0.1.1		master
IP アドレス設定
$ dpkg -l | grep dhcpcd
[何も表示されない]

$ dpkg -l | grep NetworkManager
ii  libnm0:arm64                         1.42.4-1+rpt1                       arm64        GObject-based client library for NetworkManager
ii  libnma-common                        1.10.6-1+rpt1                       all          NetworkManager GUI library - translations
ii  libnma0:arm64                        1.10.6-1+rpt1                       arm64        NetworkManager GUI library
Debian12(bookworm)は NetworkManager が標準となっています。 もし、Debian11(bullseye)以前から OS をアップグレードしている場合は、ネットワークデーモンが dhcpcd5 と競合しないように辻妻を合わせてください。
まず、nmcli で有線接続(Ethernet)を作成しておきます。
$ sudo nmcli connection modify "Wired connection 1" \
    ipv4.addresses 192.168.68.200/24 \
    ipv4.gateway 192.168.68.1 \
    ipv4.dns 192.168.68.1 \
    ipv4.method manual
以下 2 つのファイル(Ethernet / Wi-Fi)を修正します。 なお、今回はブロードバンドルータとして TP-Link Deco M9 Plus を使用しているため、無線接続名は TP-Link Deco M9 Plus.nmconnection となっていました。 こちらは接続先ルータの情報に合わせて適宜変更してください。
また、デバイスの UUID と割り当てる IP アドレスは各コンポーネント毎に適切なパラメータを設定してください。
- Wi-Fi:
$ sudo vim /etc/NetworkManager/system-connections/TP-Link\ Deco\ M9\ Plus.nmconnection
[connection]
id=TP-Link Deco M9 Plus
uuid=dc1bfc09-953f-4430-876d-a97b556590ab
type=wifi
interface-name=wlan0

[wifi]
mode=infrastructure
ssid=TP-Link Deco M9 Plus

[wifi-security]
auth-alg=open
key-mgmt=wpa-psk
psk=r07m05s18x4xngoto

[ipv4]
method=manual # Static IPv4 設定
address1=192.168.68.210/24 # Static IPv4 設定
gateway=192.168.68.1 # Static IPv4 設定
dns=192.168.68.1 # Static IPv4 設定

[ipv6]
addr-gen-mode=default
method=disabled # IPv6 無効

[proxy]
- Ethernet:
$ sudo vim /etc/NetworkManager/system-connections/Wired\ connection\ 1.nmconnection
[connection]
id=Wired connection 1
uuid=194e8ebd-ef97-3ab6-b637-0e542c6d8026
type=ethernet
autoconnect-priority=-999
interface-name=eth0
timestamp=1737200213

[ethernet]

[ipv4]
method=manual # Static IPv4 設定
address1=192.168.68.200/24 # Static IPv4 設定
gateway=192.168.68.1 # Static IPv4 設定
dns=192.168.68.1 # Static IPv4 設定

[ipv6]
addr-gen-mode=default
method=disabled # IPv6 無効

[proxy]
また、今回は IPv6 アドレスを使用しないため、ホームネットワークが IPv6 に対応している場合は、以下のコマンドで明示的に IPv6 アドレスの割り当てを無効化します。
$ sudo vim /etc/sysctl.conf
### 以下を追記
net.ipv6.conf.all.disable_ipv6 = 1
net.ipv6.conf.default.disable_ipv6 = 1
### 適用
$ sudo sysctl -p
RaspberryPi を再起動して意図した IP アドレスが割り当てられていることを確認します。
$ ip a
1: lo: <LOOPBACK,UP,LOWER_UP> mtu 65536 qdisc noqueue state UNKNOWN group default qlen 1000
    link/loopback 00:00:00:00:00:00 brd 00:00:00:00:00:00
    inet 127.0.0.1/8 scope host lo
       valid_lft forever preferred_lft forever
2: eth0: <BROADCAST,MULTICAST,UP,LOWER_UP> mtu 1500 qdisc mq state UP group default qlen 1000
    link/ether dc:a6:32:bf:8b:5c brd ff:ff:ff:ff:ff:ff
    inet 192.168.68.200/24 brd 192.168.68.255 scope global noprefixroute eth0
       valid_lft forever preferred_lft forever
3: wlan0: <BROADCAST,MULTICAST,UP,LOWER_UP> mtu 1500 qdisc pfifo_fast state UP group default qlen 1000
    link/ether dc:a6:32:bf:8b:5d brd ff:ff:ff:ff:ff:ff
    inet 192.168.68.210/24 brd 192.168.68.255 scope global noprefixroute wlan0
       valid_lft forever preferred_lft forever
SSH キーの登録
IP アドレスを固定できたら、証明書認証でリモート接続できるようにします。
1. 接続元 PC(macOS)
### ed25519 で SSH キーを生成
$ mkdir ~/.ssh
$ ssh-keygen -t ed25519 bare-metal-k8s_id_rsa

### 公開鍵をコピー
$ cat ~/.ssh/bare-metal-k8s_id_rsa.pub | pbcopy
macOS の SSH Config に登録します。
$ sudo vim ~/.ssh/config
Host master
        HostName 192.168.68.210
        User ren510dev
        Port 22
        IdentityFile ~/.ssh/bare-metal-k8s_id_rsa
        IdentitiesOnly yes
2. RaspberryPi
### 公開鍵を登録
$ touch ~/.ssh/authorized_keys
$ sudo chmod 700 -R ~/.ssh
$ sudo chmod 600 ~/.ssh/authorized_keys
$ sudo vim ~/.ssh/authorized_keys
3. 接続元 PC(macOS)
SSH キーで RaspberryPi に接続できるか確認します。
$ ssh master
Linux master 6.6.62+rpt-rpi-v8 #1 SMP PREEMPT Debian 1:6.6.62-1+rpt1 (2024-11-25) aarch64

The programs included with the Debian GNU/Linux system are free software;
the exact distribution terms for each program are described in the
individual files in /usr/share/doc/*/copyright.

Debian GNU/Linux comes with ABSOLUTELY NO WARRANTY, to the extent
permitted by applicable law.
Last login: Wed Jan 29 01:40:42 2025 from 192.168.68.106
リモートデスクトップ設定
リモートデスクトップが利用できるように VNC を設定します。 実際、デスクトップを使用する機会は殆どないのでスキップしても構いません。
Debian11(bookworm)以降、デスクトップのウィンドウマネージャーは X11 から WayVNC に変更となったみたいです。
# Wayland のバージョン確認
$ wayvnc --version
wayvnc: 0.9-dev
neatvnc: 0.9-dev
aml: 0.3.0

# VNC を有効化(0=有効 / 1=無効)
$ sudo raspi-config nonint do_vnc 0

# 証明書の生成
$ mkdir ~/.config/wayvnc
$ sudo ssh-keygen -m pem -f ~/.config/wayvnc/rsa_key.pem -t rsa -N ""
$ ls -al ~/.config/wayvnc
total 16
drwxr-xr-x 2 ren510dev ren510dev 4096 Jan 18 20:05 .
drwxr-xr-x 9 ren510dev ren510dev 4096 Jan 18 20:05 ..
-rw------- 1 root      root      2455 Jan 18 20:05 rsa_key.pem
-rw-r--r-- 1 root      root       570 Jan 18 20:05 rsa_key.pem.pub
$ sudo vim ~/.config/wayvnc/config
rsa_private_key_file=rsa_key.pem
use_relative_paths=true
RealVNC で wlan0 に割り当てた管理用 IP アドレスに VNC 接続できることを確認します。

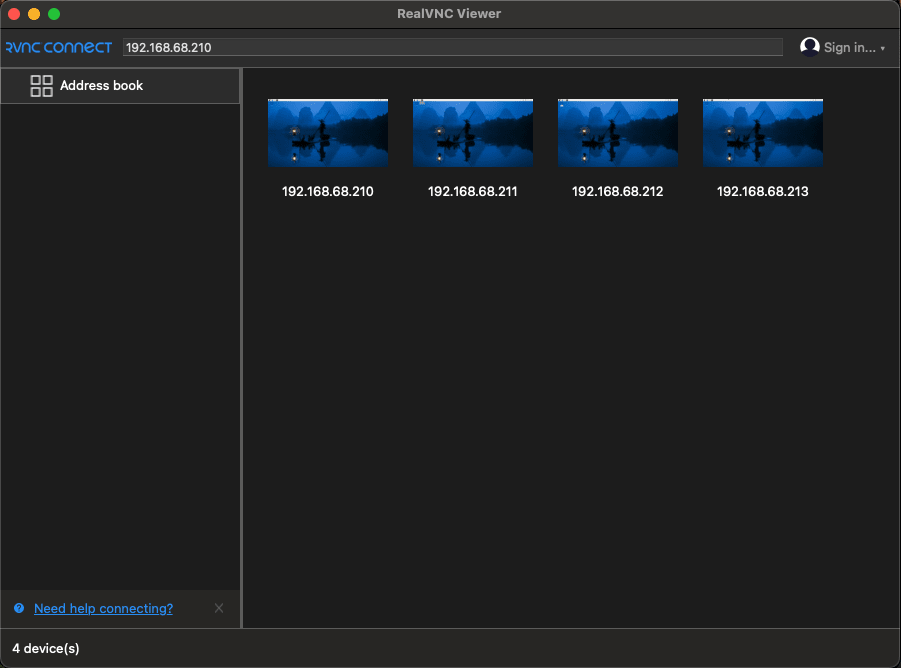
以上で基本的な RaspberryPi の初期設定は終了です。 この作業をパラメータを変えて 4 台分行います。
まとめ
今回は、Kubernetes The Hard Way に則り RaspberryPi でベアメタル Kubernetes をセルフホスティンングするための準備を行いました。 今回のブログでは、機器類の準備、RaspberryPi の初期設定、Kubernetes の構築に必要となる各種 OSS の選定や、インフラ全体の設計を固めました。
RaspberryPi で Debain12 を利用する場合、以前のバージョンと設定内容が異なっていたり、カーネルやデーモンの主要機能が変わっていたりするので、適宜ドキュメントを確認しながら作業を進めてください。
次回のブログでは、早速 kubeadm を用いて Kubernetes クラスタを構築していきます。
